Nicolas Garcin, electronic engineer at ALTYOR, gives us his 8 top tips for understanding the importance of test benches, a vital stage in the industrialization of electronic products.
#1 – A step not to be overlooked
A test bench is a piece of equipment used to check products after they leave production and to ensure that they comply with specifications. These tests could be carried out manually, but automating them means that they are secure and standardized.
At ALTYOR, 100% of our circuit boards are tested during the production phase. A PCBA (Printed Circuit Board Assembly) can perform differently depending on the components and the battery it contains. The tests are therefore there to ensure consistency and guarantee that the products you purchase are faultless.
#2 – Two test benches for maximum reliability
There are two types of test benches for testing electronics:
- Pre-assembly test benches to test circuit boards, particularly the sensors positioned on them prior to final assembly
- Assembled test benches to test the electronic functionalities of finished products
#3 – Software/Firmware and mechanics
Test benches consist of two components:
- Software: developed specifically for the product, this software is responsible for linking the test scenarios connected to the firmware and the circuit board, driven by the test bench.
- A bed of nails (mechanical component): also specific to each product, this consists of several metal pins that touch the contact points on the circuit board.
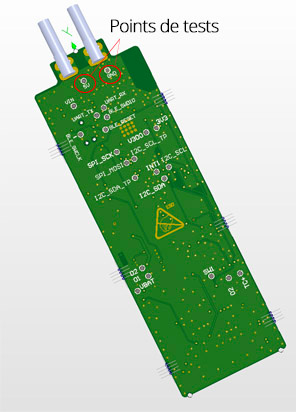
#4 – Make sure the test points are put in the correct place!
The PCBA contact points are used to check the correct operation of key functions. Their positioning must be considered from the design stage.
In the case of an already assembled product, testing can be carried out with contact points under the battery cover (if you have one and if your design allows it).
For small products, without the space required for contact points, testing is performed by wireless link (Bluetooth, Wi-Fi, etc.). However, voltage testing does require a wire link.
Having test points (even better if they are accessible without opening the product) makes it easier to perform diagnostics in case of reworking or product returns. So be careful these are not overlooked!
#5 – Think about the legal aspects
Benches generate labels with legal traceability information: CE, RoHS, serial number, logo and address of the manufacturer. With this traceability system, we can find out the day on which a product was assembled and tested, in which box it was placed and the shipping date and address.
#6 – Write the specifications as soon as possible
The specifications of the test bench should be written during the research and electronic design phases of the product. Don’t worry – our engineers in the design office write them. Specifications are used to assess what information should be tested, in agreement with the customer. These specifications must be consistent with the firmware, which may require several back and forths with the customer and the development of dedicated test software.
The complete and final validation of the test bench is then carried out on a minimum of 20 products.

#7 – Long live communication!
Setting up the communication between the bench and the product can be tedious, particularly when it is not ALTYOR developing the product firmware.
This firmware must communicate with our test software. As such, there are often many adjustments to be made and customer/partner iterations, hence our support work.
#8 – Significant cost and lead times
The cost of a test bench depends on its complexity. We do know, however, that the development of a test bench takes between six and eight weeks, including customer interactions. This is a considerably long time, but it can be reduced depending on the number of stakeholders and their expertise.
Find more tips for theindustrialization of your smart device
If you have questions or require further information, please contact us at: moc.r1722069311oytla1722069311@ssen1722069311isub1722069311